The T1N Sprinter Buyer's Guide: Every Achilles Heel and How to Slay It
A field guide for anyone about to buy, already owns, or is quietly cursing at a first-gen Sprinter in their driveway.

Affiliate Disclosure: This post contains affiliate links. When you purchase through these links, we may earn a small commission at no additional cost to you. This helps support our content while connecting you with the exact tools and parts we actually use and recommend. We only link to products we've personally tested or would genuinely recommend to fellow T1N owners.
OWNERSHIP · MERCEDES-BENZ T1N SPRINTER · 2002–2006
There is a specific sound a T1N Sprinter makes at idle. It's a kind of unapologetic mechanical clatter: part tractor, part taxi, part old Mercedes limousine with a smoking habit. If you own one, you love it. If you're about to buy one, you should know that sound is the easy part.
The first-generation Sprinter (sold from 2002 to 2006 in North America as a Dodge, Freightliner, or Mercedes-Benz, all rolling off the same line in Düsseldorf) is arguably the best cargo van ever imported to this continent. The 2.7L inline-five OM647 turbodiesel routinely sees 400,000 miles. The chassis is so over-engineered that ambulances, food trucks, shuttle buses, UPS vans, and a generation of #vanlife conversions have all been built on it. People actively hunt high-mileage T1Ns two decades after they left the showroom.
They also rust, leak, and fail in very specific, very expensive ways. A T1N in denial is a T1N about to cost you four grand. A T1N that's been properly sorted is a 500,000-mile vehicle that will outlive your relationship to it.
This post walks through the failure modes that matter: the ones a pre-purchase inspection should catch, the ones that kill engines, and the ones that are annoying but cheap if you know what they are. For each, you get: what it is, how to spot it, and what to actually do about it.
If you take one thing from this post: rust kills more T1Ns than any mechanical failure. Inspect the body before you inspect the engine.
1. Rust: The Real Engine Killer
| DIFFICULTY | ROUGH COST | URGENCY |
|---|---|---|
| Varies | $0 to totaled | HIGHEST |
Every T1N is rusting. The only question is where, and how much. Mercedes used notoriously thin corrosion protection on the early Sprinters, and the body panels were made in Germany, shipped to Düsseldorf, and had plenty of time to start oxidizing before they were ever painted. Combine that with twenty-plus winters of road salt and you get a van whose body can fail before the drivetrain even warms up.
Where to look (in order of importance)
-
Rear wheel arches. The inner and outer arches rust from the inside out. Bubbling paint above the arch is stage two. Holes are stage three. By the time it's visible, there's usually three times more rot behind the panel.
-
Rocker panels and step wells. Water collects in the step wells at the sliding door and eats through from underneath. Pull the rubber mat out and look.
-
Lower door edges. All of them. Especially the rear barn doors. The drain holes clog and the doors rot from the bottom up.
-
Frame rails, especially near the rear shackle mounts. This is structural. A magnet and a small hammer will tell you more than any photo.
-
The area under the windshield cowl. Leaves pack in, water sits, and the metal under the wiper motor rots through. You find it when rainwater starts appearing on the passenger-side floor.
What to do
Prevention beats repair by an order of magnitude. If you live anywhere salt touches the road and you're buying a clean southern/western T1N, get it Fluid Film or Woolwax treated before its first winter. Annually. Every year. This is not optional. A $200 undercoating job buys you a decade.
If you're looking at a rusty one: walk away from frame rot. Walk away from rockers that crumble to a screwdriver. Body panel rust can be repaired, but you need to know going in that aftermarket wheel arch panels exist (they're not cheap) and bodywork on a tall van is priced by the hour and the hours add up fast.
2. Black Death
| DIFFICULTY | ROUGH COST | URGENCY |
|---|---|---|
| Very High | $200 DIY / $1,500–$4,000 shop | HIGH |
Black Death is what the T1N community calls the charming phenomenon where an injector seal fails, combustion gases blow past it, and soot plus fuel plus oil bakes into a black lava-like crust around the base of the injector. Left alone, it eats the cylinder head around the injector bore until the injector itself can't be removed without destroying the head.
How to spot it
- Pop the plastic engine cover. Look at the base of each injector where it meets the head.
- Clean metal = fine. A crusty black volcano of carbon = Black Death.
- Also: a "chuffing" or "ticking" sound at idle that changes with RPM, and an oily, diesel-scented haze from under the hood.
What to do
The fix is conceptually simple and mechanically a nightmare: pull the injector, clean the bore, replace the copper washer and the heat shield, torque it correctly. The nightmare part is that a seized injector can require specialized slide hammers, heat, and patience measured in afternoons. Some come out in five minutes. Some require a machine shop and a new head.
Rule of thumb: if you catch it early (just some crust, injector still moves) you can do all five for a few hundred bucks in parts over a weekend. If you ignore it until the engine is misfiring, you are in four-figure territory and possibly shopping for a cylinder head.
The number one thing you can do for the longevity of a T1N engine is pull the injectors every few years, clean the bores, and replace the copper washers. It is the oil change of this engine.
3. The Turbo Resonator (aka The Hand Grenade)
| DIFFICULTY | ROUGH COST | URGENCY |
|---|---|---|
| Easy | $40–$150 | MEDIUM |
Sitting in the intake tract between the turbo and the intercooler is a small plastic resonator whose only job is to quiet the turbo's whistle. Mercedes made it out of a plastic that does not enjoy being hot and pressurized for 200,000 miles. It cracks. Then it splits. Then one day you floor it up an on-ramp and it explodes, the van dumps all its boost, and you limp home on what feels like four cylinders.
The fix
This is the easiest repair on the list and one of the most satisfying. You have three options:
- Replace with OEM. Fine. It'll last another decade and then explode again.
- Replace with an aluminum aftermarket resonator. Maybe $100–$150. Permanent fix. The turbo whistles a little more. Most people consider this an upgrade.
- Delete it entirely with a silicone coupler. Under $40. Van sounds like a jet on boost. Arguably the most fun-per-dollar mod on the platform.
If the van you're buying still has the original plastic resonator and it's over 150,000 miles, budget a repair on the drive home, not as a maintenance item.
4. The Harmonic Balancer
| DIFFICULTY | ROUGH COST | URGENCY |
|---|---|---|
| Medium | $250–$600 | HIGH |
The harmonic balancer is a two-piece rubber-bonded pulley on the front of the crankshaft. Its job is to dampen the vibrations of the inline-five. It is also a wear item that Mercedes did not, at the time, classify as a wear item. Somewhere between 120,000 and 250,000 miles, the rubber isolator between the inner hub and the outer pulley dies. The outer ring starts to wobble, and you get one of two symptoms:
- Accessory belt squeal, walk, or flat-out belt loss.
- A crankshaft position sensor reading that goes haywire, throwing codes or causing hard starts.
In the worst case, the outer pulley ring separates entirely at highway speed and takes your belt, power steering, and alternator with it. In a van. On a Tuesday. Far from home.
How to check it
With the engine off, grab the outer edge of the crank pulley and try to rock it. Any visible play between the outer ring and the inner hub means it's done. Also look for rubber "squeeze-out" around the bonding line, and check for wobble with a timing light while running.
This is a job a competent DIYer can do on their back on a Saturday with the right harmonic balancer puller. A shop will quote it reasonably, and doing it at the same time as a belt and tensioner saves labor. Don't skip it.
5. EGR, Swirl Flaps, and the Intake Manifold Mudslide
| DIFFICULTY | ROUGH COST | URGENCY |
|---|---|---|
| Medium | $0 DIY / $400–$1,000 shop | MEDIUM |
Every diesel from this era has an EGR (exhaust gas recirculation) valve that routes hot, sooty exhaust back into the intake to lower combustion temperatures and meet emissions. Every diesel from this era also has an intake manifold that slowly fills with a peanut-butter-textured sludge made of soot plus the fine mist of oil vapor from the crankcase breather. Over time, this coats the intake runners, chokes the engine, and kills fuel economy and power.
The 2.7L OM647 is better than some of its successors here: it doesn't have the motorized swirl flaps that infamously snap off and get sucked into cylinders on later Mercedes diesels, but it still builds up carbon, and the EGR valve itself gets gummed to the point where it sticks open or closed.
Symptoms
- Sluggish throttle response, particularly at low RPM.
- MPG dropping 2–4 over what the van used to do.
- A check engine light with an EGR-related code.
- Black soot visible in the intake tubing when you pop it off.
The fix
Pull the intake manifold, clean it out (a plastic putty knife, a bucket, and a shop vac; wear gloves, this stuff is horrible), clean or replace the EGR valve, and reinstall with new gaskets. Budget a Saturday. While you're in there, inspect the glow plugs and replace them if the van is a cold-starter.
Some owners go further and install an EGR delete or a blocking plate. This is a gray area: functionally it works beautifully and the engine runs cleaner internally, but it will not pass emissions testing in states that check, and it is technically illegal under federal law regardless of state. Your van, your call, but know what you're signing up for.
6. The 722.6 Transmission and Its Conductor Plate
| DIFFICULTY | ROUGH COST | URGENCY |
|---|---|---|
| Medium | $400–$1,200 | MEDIUM |
The five-speed 722.6 automatic behind the OM647 is a fundamentally good transmission. It was used in everything from E-Class sedans to G-Wagens. Treat it right and it will go as long as the engine. Treat it wrong (which is to say, never service it because someone at a Jiffy Lube told you it was "sealed for life") and it will teach you what a $5,000 lesson feels like.
What it actually needs
- A fluid and filter service every 60,000–80,000 miles. Use the correct fluid. The 722.6 is picky; wrong fluid will cause harsh shifting within a few hundred miles.
- A new conductor plate around 150,000–200,000 miles. The conductor plate is the internal electronic module that controls the transmission. When it starts to fail you get erratic shifting, getting stuck in limp mode (2nd gear only), or speedometer glitches. Many shops replace the conductor plate preemptively with the fluid service.
Sealed-for-life is a marketing phrase, not an engineering one. Any used T1N without a documented transmission service history should get one immediately, and you should drop the pan to inspect the magnet for metal before committing to a full flush.
7. Glow Plugs, Glow Plug Module, and Hard Cold Starts
| DIFFICULTY | ROUGH COST | URGENCY |
|---|---|---|
| Easy to Brutal | $100 parts / varies on labor | LOW to HIGH |
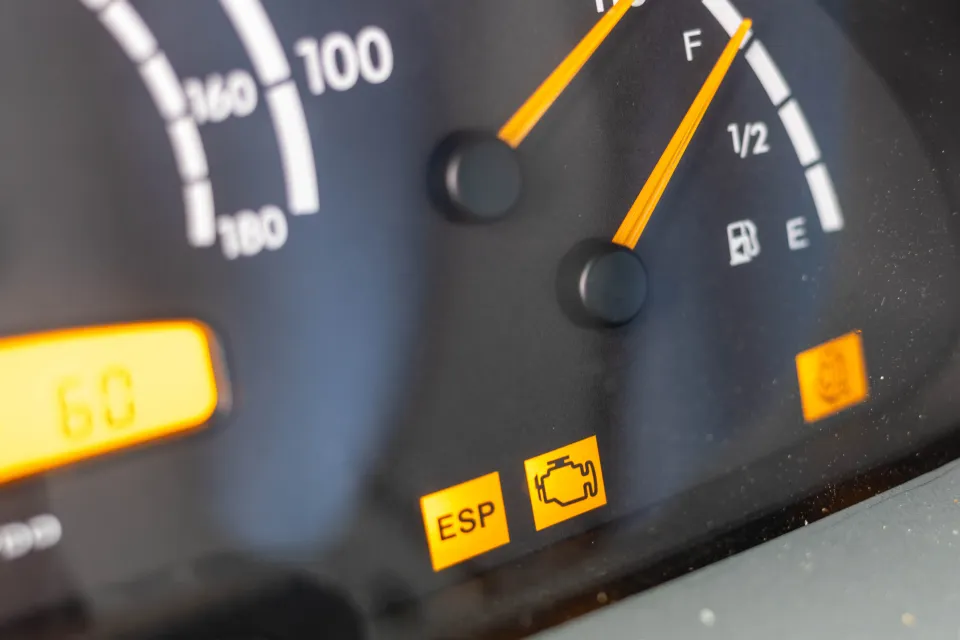
A healthy T1N starts on the first rotation of the crank, even at 20°F. If yours needs a long crank in the cold, or chuffs white smoke and shakes before settling, your glow plugs or the glow plug control module are on the way out.
Replacement is conceptually easy: unscrew five glow plugs from the top of the head, screw in five new ones. The brutal part is when one (or more) is seized. A seized glow plug can shear off, and extracting the remains without pulling the cylinder head is its own specialized skill. Some independent diesel shops have the tooling. Dealers often just quote you a head R&R and walk away.
Strategy
If the van starts fine, leave the plugs alone. If it's starting to crank longer than it used to, plan the job for warm weather, soak the plugs in penetrating oil for a week before you attempt removal, and pull them with the engine warm (not hot). Do them one at a time, and if one fights you, stop and reassess. Breaking a glow plug in a driveway is how $80 in parts becomes $3,000 in regret.
8. The Small Stuff That Adds Up
None of these will strand you. All of them will annoy you. Budget a few hundred dollars and a weekend to knock them out and your daily ownership experience improves disproportionately:
-
Door lock actuators. Mercedes used a vacuum-operated central locking system. The actuators age, the lines crack, and one day the sliding door won't lock anymore. Aftermarket replacements exist and are a couple hours of work per door.
-
Key fob remote. The original infrared key fob fails. Replacement is possible but the programming is fiddly. Many owners just live with using the key in the door.
-
Instrument cluster pixels. The LCD in the dash loses pixels. A ribbon cable re-soldering fixes it permanently. Third-party services will do this for about $150.
-
Stretched timing chain. By 250,000 miles, the timing chain has stretched enough to throw a code. Replacement is not trivial but not terrifying either. It is a job.
-
Crankshaft Position Sensor. Cheap. Fails intermittently. Causes no-start conditions that come and go. Carry a spare in the glovebox for under $40.
-
Fuel filter water drain. There is a small drain screw on the bottom of the fuel filter housing. Open it every oil change, drain a few tablespoons of water off the bottom, close it. Most owners have never touched theirs. Your injection pump will thank you.
The Pre-Purchase Checklist
If you're about to look at a T1N this weekend, take this with you:
- Crawl under it. Magnet and small hammer. Check frame rails, rockers, arch inners, cowl drain.
- Pop the engine cover. Look at the base of every injector for black crust.
- Grab the harmonic balancer and try to rock it. Any play = walk away or negotiate hard.
- Pull the intake tube off the turbo. Look for oil pooling (turbo seals) and for the state of the resonator.
- Start it cold. It should fire within two cranks. White smoke that lingers = glow plugs or worse.
- Drive it. All five gears, full highway, full stop-and-go. Watch for harsh 2-3 shift, flared shifts, or limp mode.
- Ask for transmission service records. No records = assume it's never been done and factor $500 into your offer.
- Scan it with an OBD-II reader that can read Mercedes-specific codes. The generic ones won't catch much.
- Check every door, every lock, every window, every light. Electrical gremlins in a T1N are individually small and collectively expensive.
Essential T1N Tool Kit
If you're going to own a T1N, these tools will save you hundreds in shop visits:
Diagnostic Tools
- Mercedes-compatible OBD scanner - Essential for reading Sprinter-specific codes
- Digital multimeter - For chasing electrical gremlins
- Compression tester - Check engine health
Basic Hand Tools
- Metric socket set - Most fasteners are metric
- Torque wrench set - Critical for injector work
- Harmonic balancer puller - For when (not if) it fails
Specialty Items
- Injector removal tool set - For Black Death repairs
- Penetrating oil - PB Blaster or similar
- Diesel additive - For fuel system maintenance
Maintenance Supplies
- Fluid Film or Woolwax - Annual rust prevention
- Transmission fluid - MB 236.14 specification
- Engine oil - 5W-40 synthetic diesel oil
As an Amazon Associate, we earn from qualifying purchases. These links help support our content while connecting you with the exact parts and tools discussed.
Important Disclaimers & Additional Information
Affiliate Link Disclosure: This post contains affiliate links to Amazon and other retailers. When you make a purchase through these links, we receive a small commission at no additional cost to you. These commissions help us maintain this website and continue creating detailed technical content for the T1N community.
Product Recommendations: All linked products are items we have personal experience with, have researched extensively, or are widely recommended by the T1N community. We do not recommend products solely based on commission rates. Our goal is to connect you with the exact tools and parts that will actually help you maintain your Sprinter.
Technical Information: The information in this guide is based on our experience and research, but every T1N is different. Vehicle maintenance can involve significant risks. Always consult with qualified mechanics when in doubt, especially for safety-critical components. We are not responsible for any damage or injury that may result from following the information in this guide.
Legal Note on Modifications: Some modifications mentioned (like EGR deletes) may not be legal in all jurisdictions and could affect emissions compliance. Check your local and federal regulations before making any emissions-related modifications. This information is provided for educational purposes only.
Parts Compatibility: While we've made every effort to link to correct parts, always verify compatibility with your specific vehicle's VIN and model year before purchasing. Mercedes made running changes throughout the T1N production run.
Price Accuracy: Prices mentioned in this guide are estimates based on current market conditions and may vary significantly based on your location, timing, and specific part needs. Always get multiple quotes for major repairs.
Community Resources: The T1N community is incredibly knowledgeable and helpful. Consider joining forums like SprinterSource.com, T1N.org, and relevant Facebook groups for additional support and advice from experienced owners.
Last updated: April 2026
The Honest Bottom Line
A T1N Sprinter is not a Toyota. You will turn wrenches on it, or you will pay someone to. The difference between a sorted T1N and a money pit is almost entirely about whether the previous owners treated it like a commercial vehicle that needs commercial-grade maintenance, or like a minivan with extra legroom.
But here is the thing nobody writes clearly enough: a well-sorted T1N is the single most useful vehicle most people will ever own. 20+ MPG while hauling 3,000 pounds. Standing headroom inside. Parts availability that will outlast the next two decades because UPS, FedEx, and every municipal fleet in Europe still runs them. A chassis designed to do a million kilometers in commercial service. And a cult of owners who have, collectively, documented every failure mode and every fix in obsessive detail on forums that are still active twenty years later.
Buy the best one you can find. Sort the rust first, the injectors second, the transmission third. Keep the small stuff at bay. Wax it in the fall. Check the fuel filter drain at every oil change. And when someone at a gas station asks what year it is and you say 2005, enjoy the look on their face when you tell them you plan to put another 200,000 miles on it.
Because you will.
Let's Talk About It in the Community
Have questions about any of these issues? Want to share your own T1N horror stories or success stories? Join the discussion at T1N World Community where experienced owners share real-world solutions, troubleshooting tips, and the kind of detailed technical knowledge that only comes from years of turning wrenches on these vans.
Whether you're dealing with your first case of Black Death, trying to source hard-to-find parts, or just need someone to confirm that yes, that noise is normal, the T1N community has been there. Post your questions, share your fixes, and help the next owner avoid the expensive lessons you've already learned.
Join the T1N World Community Discussion →