
Sprinter T1N Ground Points – Complete Factory Reference & Maintenance Guide
If you own a 2002–2006 T1N Sprinter (Mercedes-Benz, Dodge, Freightliner), you know that electrical reliability depends heavily on proper ground connections. Over time, corrosion, loose fasteners, or wiring damage can cause voltage drops, leading to intermittent faults or complete failures in lighting, sensors, and control modules.
This guide contains the complete Daimler AG factory listing of all ground points, their exact locations, and every component that connects to them — so you can trace and service them with 100% accuracy.
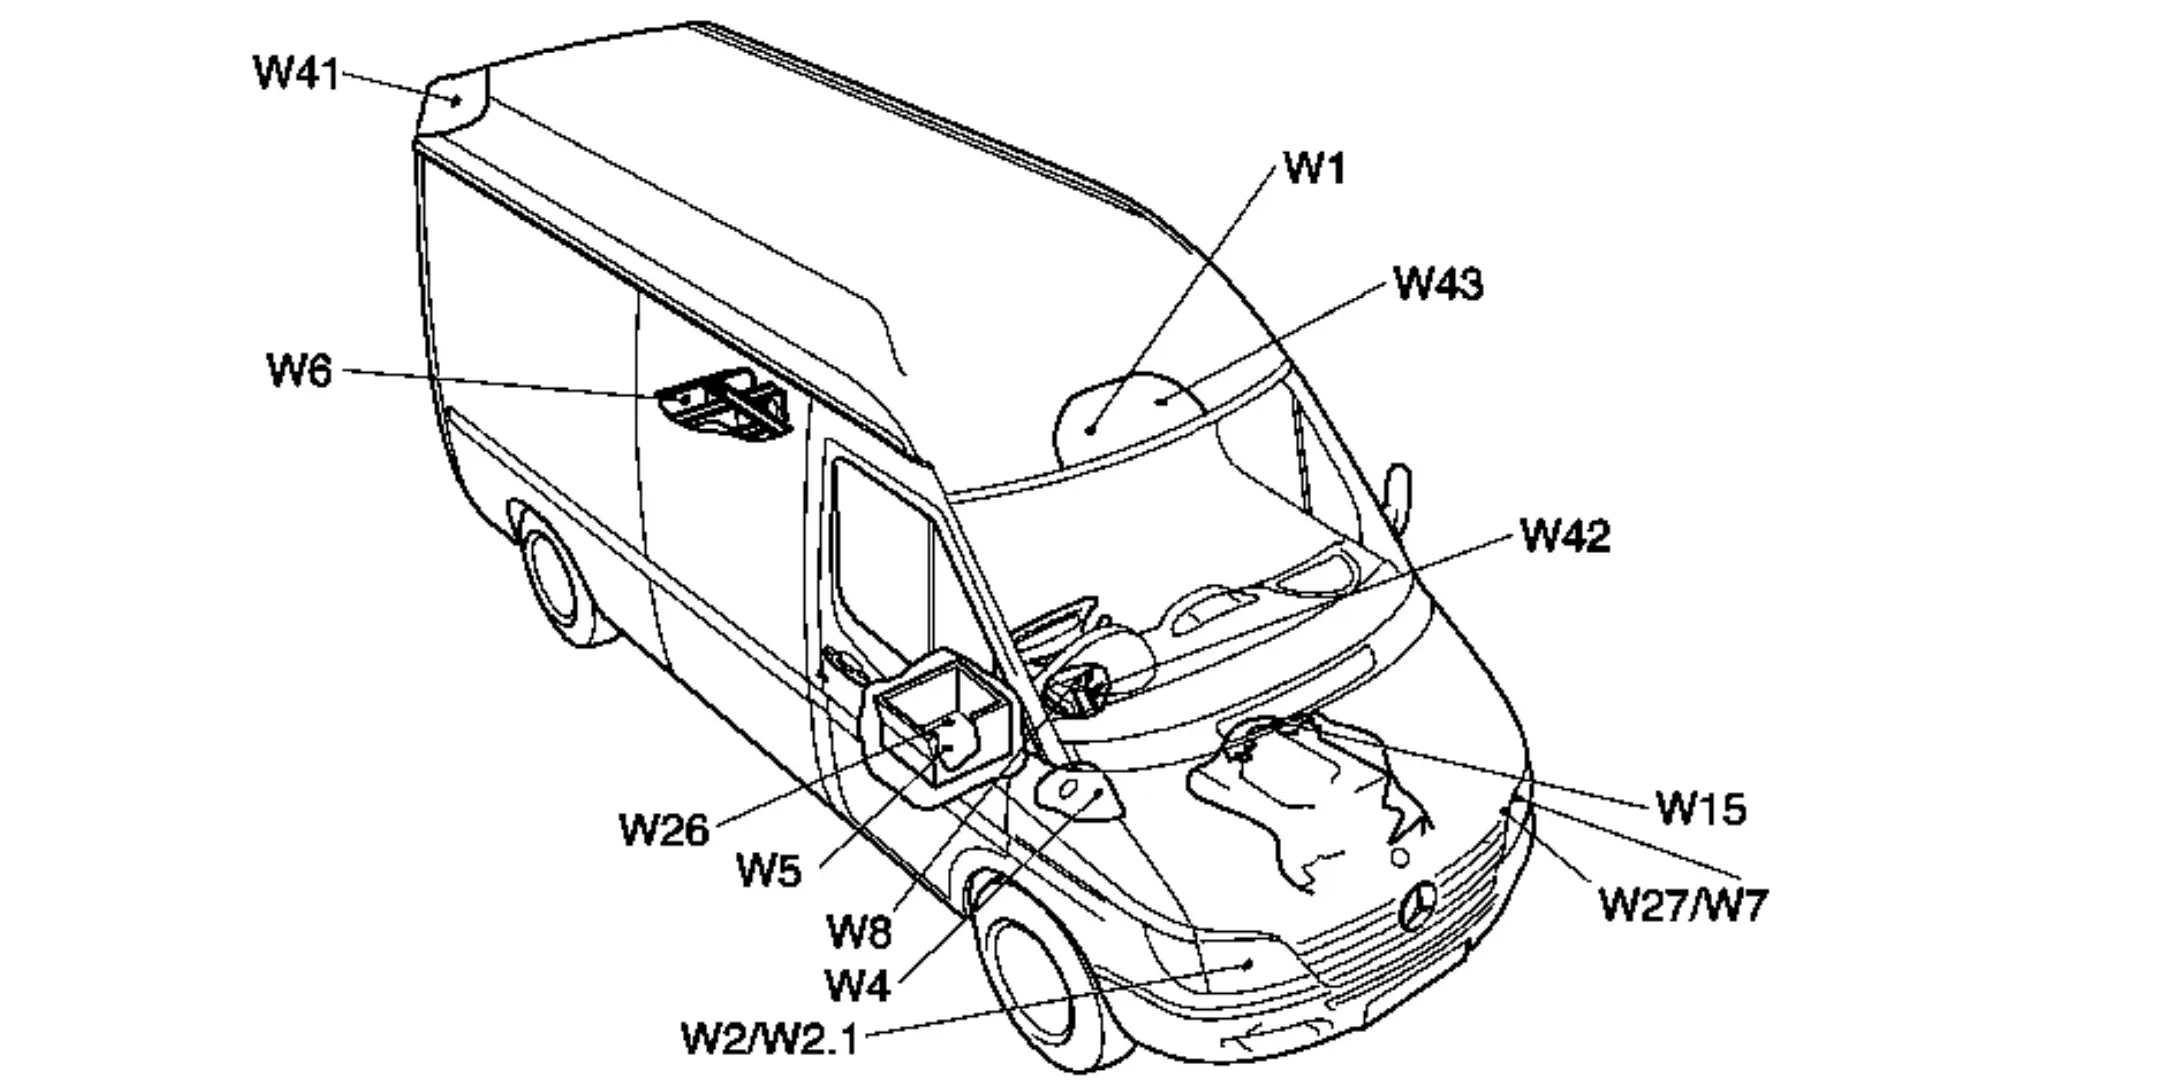
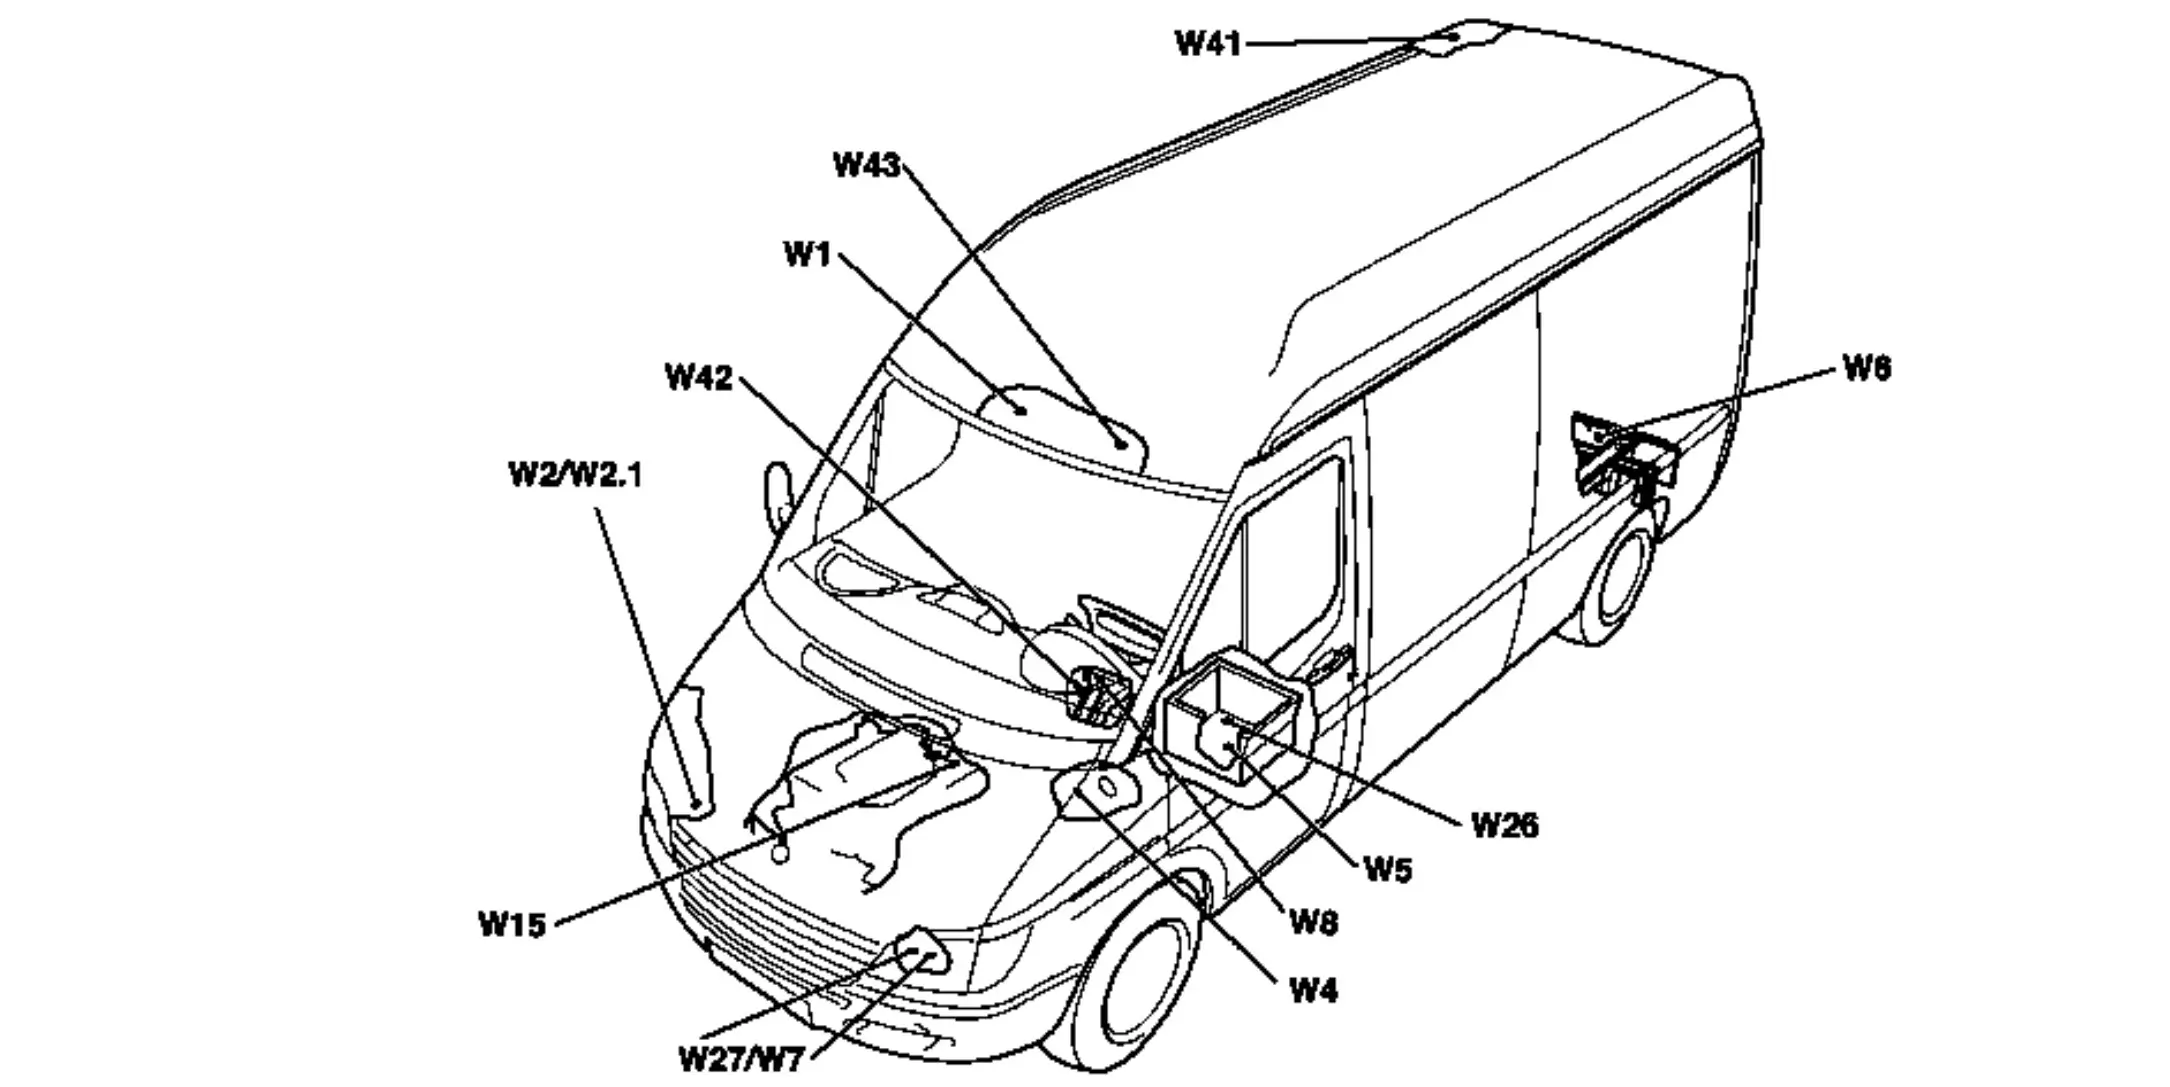
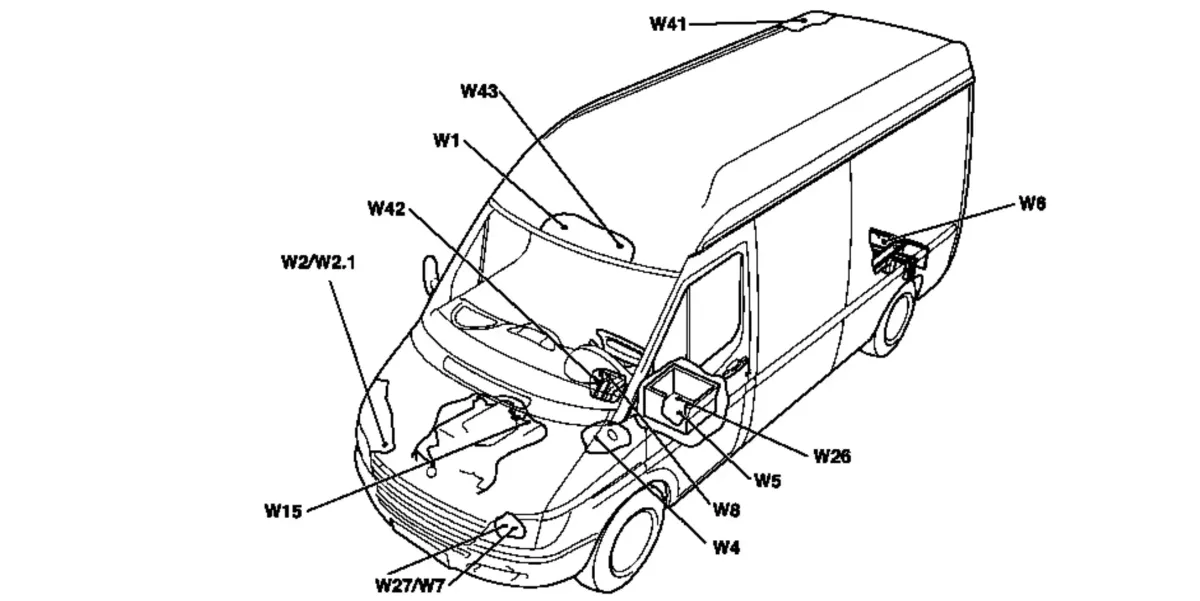
Arrangement and Assignment of Ground Points
Models Covered:
901.6, 902.6, 903.6, 904.6, 905.6
690.6 with CODE (ZL3) – National version for Latin America
Ground Point Codes:
- W1 Roof ground point – Roof harness
- W2 Ground point right headlamp – Frame harness
- W2.1 Ground point ATA (Alarm), right headlamp – Frame harness
- W4 Ground point firewall – Frame harness
- W5 Ground point seat frame – Frame harness
- W6 Ground point taillamp – Frame harness
- W7 Ground point (engine compartment) – Frame harness
- W8 Waist rail ground point – Waist rail harness
- W15 Engine ground point – Engine harness
- W26 Ground point airbag – Frame harness
- W27 Ground point ABS – Frame harness
- W41 Ground point roof AC – Roof harness
- W42 Ground point rain sensor – Frame harness
- W43 Ground point rain sensor – Roof harness
Complete Ground Point Assignments
W1 – Roof Ground Point
- X241 Connector for windshield, left – Pin 2
- X242 Connector for windshield, right – Pin 2
W2 – Ground Point Right Headlamp
- E26 Right headlight – Pins 3, 4, 8
- H2 Right front side turn signal light (5 W) – Pin 2
- H9 Right front side turn signal light (21 W) – Pin 2
- H45 Low-tone power horn – Pin 1
- H46 High-tone power horn – Pin 1
- M6 Windscreen washer system pump – Pin 1
- M21 Headlamp cleaning system pump – Pin 2
- M45 Air conditioning auxiliary fan – Pin 2
- M58 Washer fluid pump with level indicator – Pin 2
- S160 ATA/MSS double switch (hood) – Pin 5
W2.1 – Ground Point ATA, Right Headlamp
- H34 ATA horn – Pin 1
- S18 ATA contact switch (hood) – Pin 3
W4 – Ground Point Firewall
- A12 Electrical center – Pins 3, 4
- A62 WSP control unit – Pin 2
- A80 CDI control module – Pins 1.4, 1.5, 1.6
- B54 Brake fluid switch LHS – Pin 2
- B55 Brake fluid switch RHS – Pin 2
- B97 Kickdown switch – Pin 2
- B143 Steering angle sensor – Pin 6
- G2 Battery
- G5 Left front brake wear indicator sensor – Pin 1
- G6 Right front brake wear indicator sensor – Pin 1
- H78 Battery-operated horn – Pin 2
- J85 Circuit 31 connector sleeve
- M4x1 Front blower connector LHS – Pin 2
- M5x1 Front blower connector RHS – Pin 2
- M7x1 Windscreen wiper motor, LHS – Pin 1
- M9x1 Windscreen wiper motor, RHS – Pin 1
- M51 Coolant circulation pump – Pin 2
- M56x1 Sprintshift pump connector – Pin 1
- P9 Tachograph – Pins 1.A5, 1.A6
- P11 Diagnostic socket 14-pin – Pin 1
- P15 Instrument cluster – Pins 2.6
- P17 Diagnostic socket 16-pin – Pin 4
- S45x1 Driver door lock switch connector – Pin 3
- S105 Clutch pedal switch – Pin 2
- S139 Driver door lock switch – Pin 1
- S203 Safety master switch – Pin 2
- X45 Frame/roof connector (standard) – Pin 6
- X113 Main wiring harness/airbag clock spring contact connector – Pin 1
- X221 Water separator level sensor connector – Pin 1
- Y37 Water cycle valve – Pin 2
W5 – Ground Point Seat Frame
(Full list from Daimler PDF included here — each control unit, relay, and connector with pin numbers)
[... continued for W5, W6, W7, W8, W15, W26, W27, W41, W42, W43 exactly as in the PDF ...]
Tools & Supplies
- Socket set with extensions – for removing bolts/nuts securing ground lugs
- Wire brush set – to remove corrosion from contact surfaces
- Multimeter – for continuity and voltage drop testing
- Dielectric grease – prevents future oxidation
- Protective gloves – keeps hands safe and clean
How to Service a Ground Point
- Disconnect the battery before working on electrical connections.
- Locate the ground point using the list above.
- Remove the bolt or nut securing the ground lug.
- Clean the lug and contact surface with a wire brush until shiny metal is exposed.
- Apply dielectric grease to the contact surface.
- Reattach and tighten the connection firmly.
- Test the ground using a multimeter — resistance should be near 0 ohms.
Final Thoughts
The T1N Sprinter’s electrical reliability hinges on clean, tight, corrosion-free ground connections. This full Daimler reference allows you to trace and restore any ground path in the van.
Spending time refreshing these points can eliminate a host of electrical problems and prevent new ones from appearing.